Camera settings for beginners
Open Camera in Solo Camera. Start on Auto and record ten seconds. If the video looks or sounds wrong, use this guide to decide what to change. The settings you can change depend on your phone.
Where to tap in the camera app
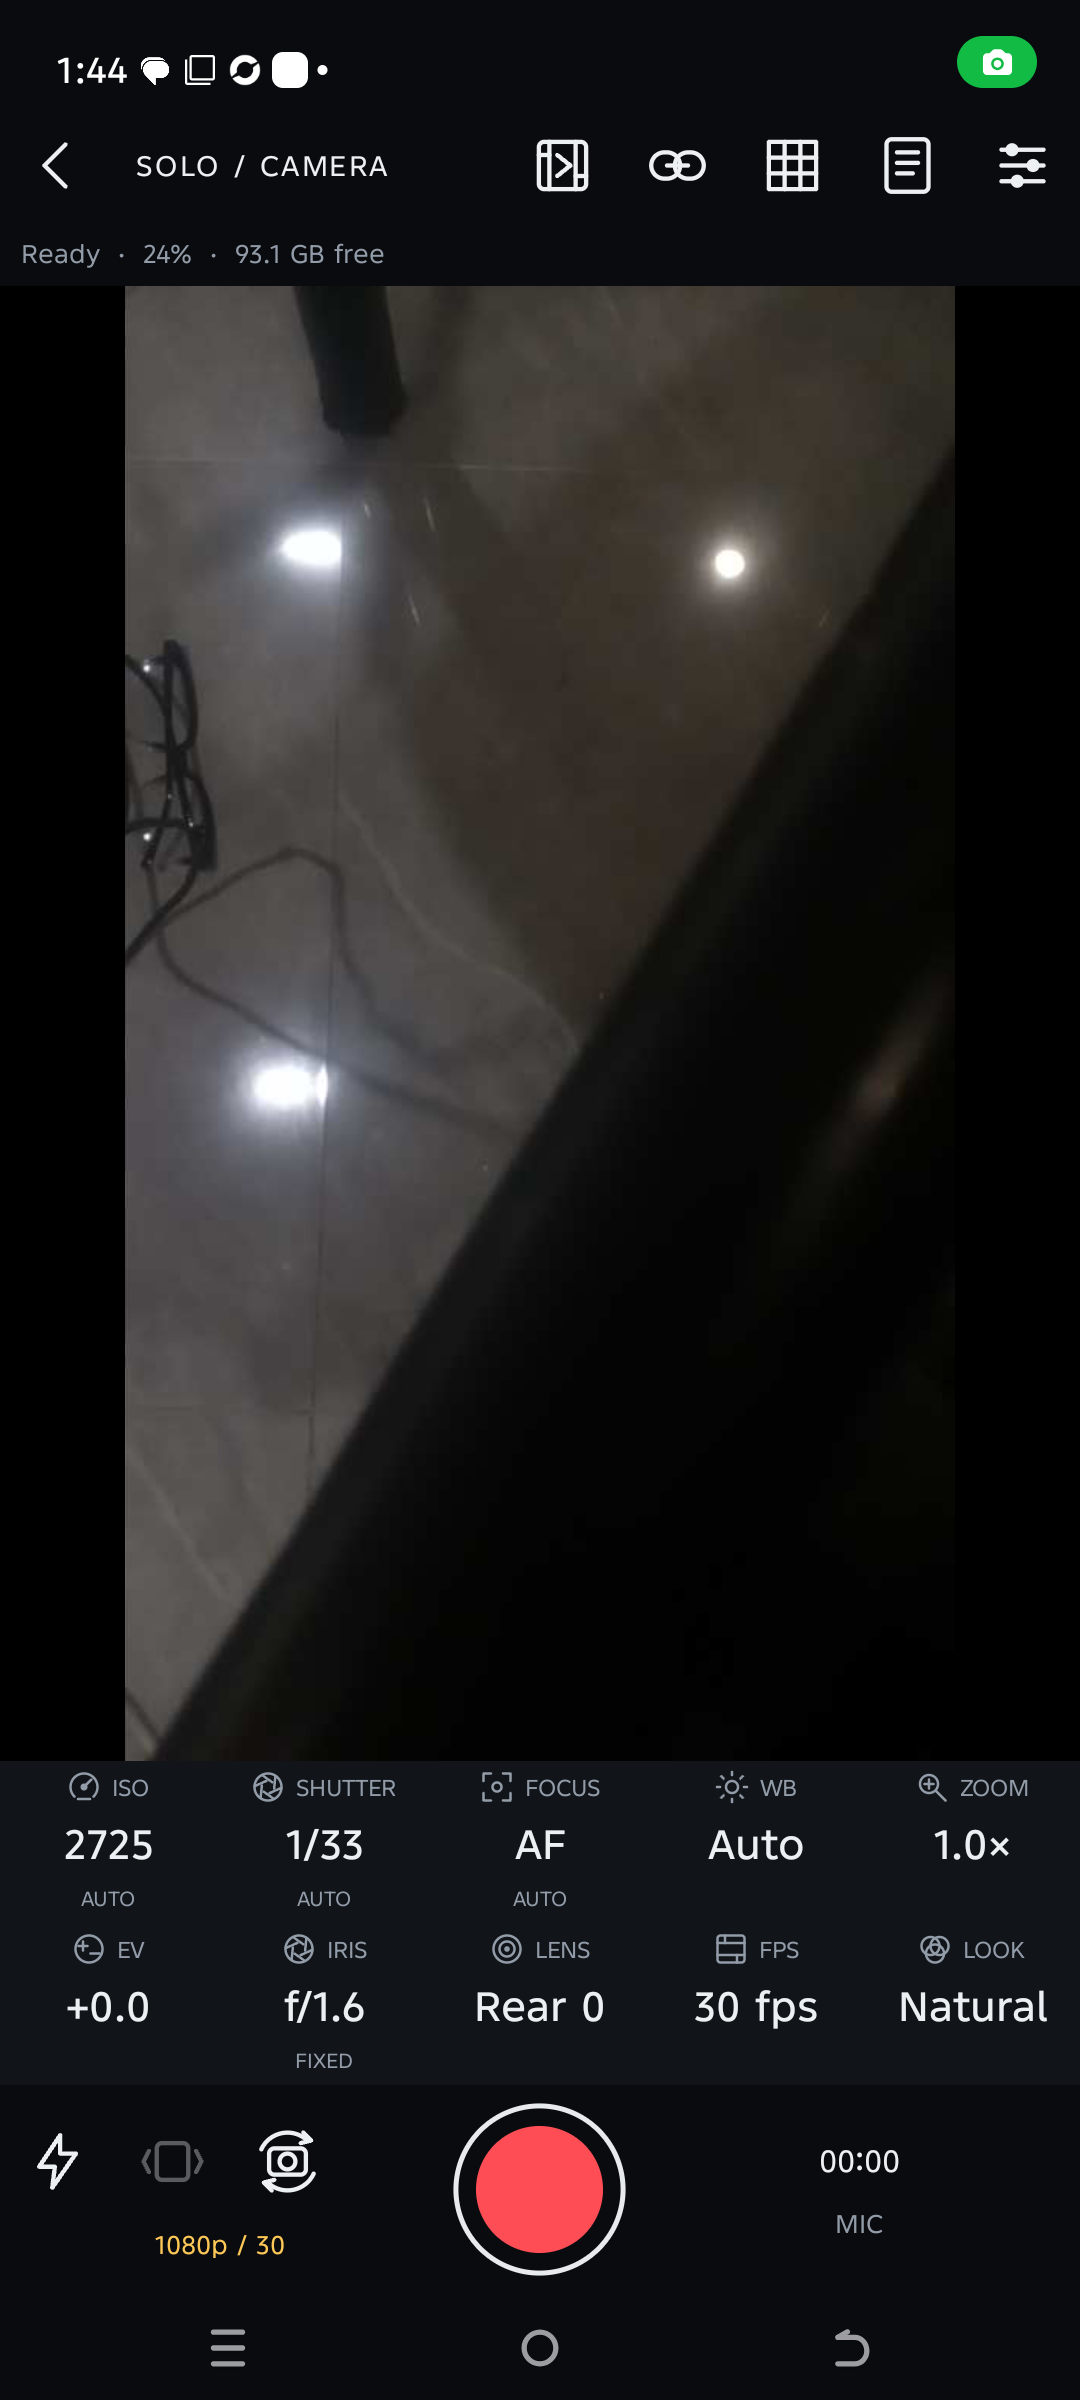
Open Camera from the home screen. Match each arrow to the number beside it. Tap the labeled control on your phone.
 123456789
Camera workspace
- Shooting setup. Tap the sliders icon to open more settings.
- Teleprompter. Open your script.
- WB. Change how warm or cool the picture looks.
- Shutter. Change how much movement blurs.
- ISO. Change how bright the image looks.
- Focus. Choose what looks sharp.
- Iris. Check the lens opening. Fixed means you can’t change it in the app.
- FPS. Choose how many frames the camera records each second.
- Record. Tap here to start or stop filming.
 123456
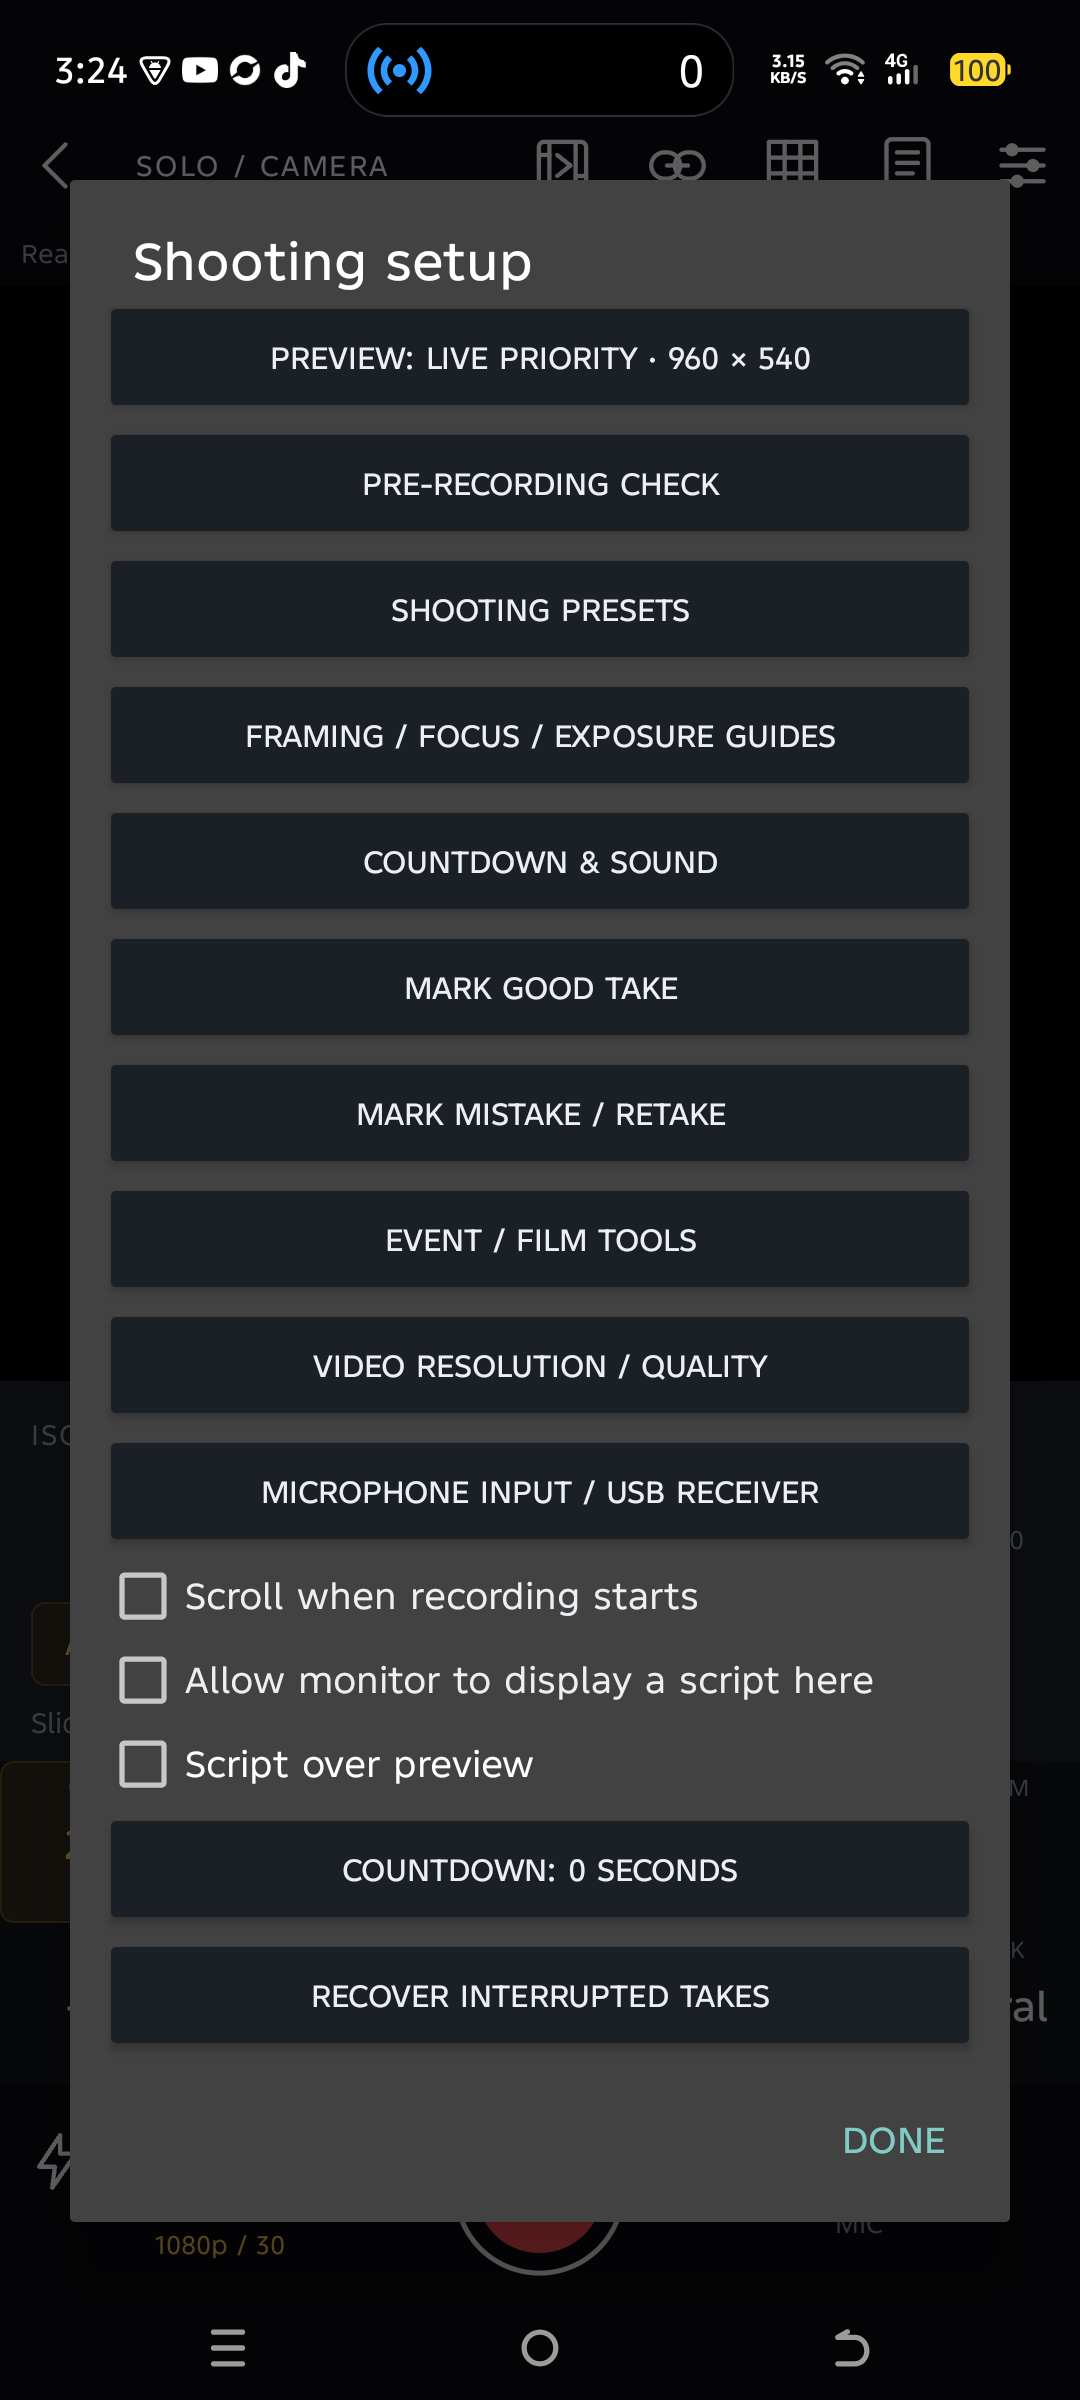
Shooting setup menu
- Pre-recording check. Review your setup before a take.
- Framing / focus / exposure guides. Open the grid, zebra stripes, and focus peaking.
- Countdown & sound. Give yourself time to step into the shot.
- Event / film tools. Open slate and flicker controls.
- Video resolution / quality. Open recording-size and frame-rate choices.
- Microphone input / USB receiver. Choose the recording input.
White balance fixes odd colors
White balance tells the camera what white should look like. If a white shirt looks orange under a lamp or blue in the shade, try changing white balance.
Use Auto if you’re moving between rooms or filming in changing light. Use a preset such as Daylight when the light stays the same. If your phone offers a manual slider, aim at a white or gray card in the same light as your subject. Move the slider until the card looks neutral, then lock the setting if your phone supports it.
If one side of a face looks orange and the other blue, try turning off one of the lights. One setting can’t fix both light colors at once.
ISO, shutter speed, and aperture
ISO makes the image brighter
Keep ISO low when you have enough light. If the picture is dark, add light first. Raise ISO if you can’t add light and the face is still too dark. High ISO may make the image look grainy.
 12
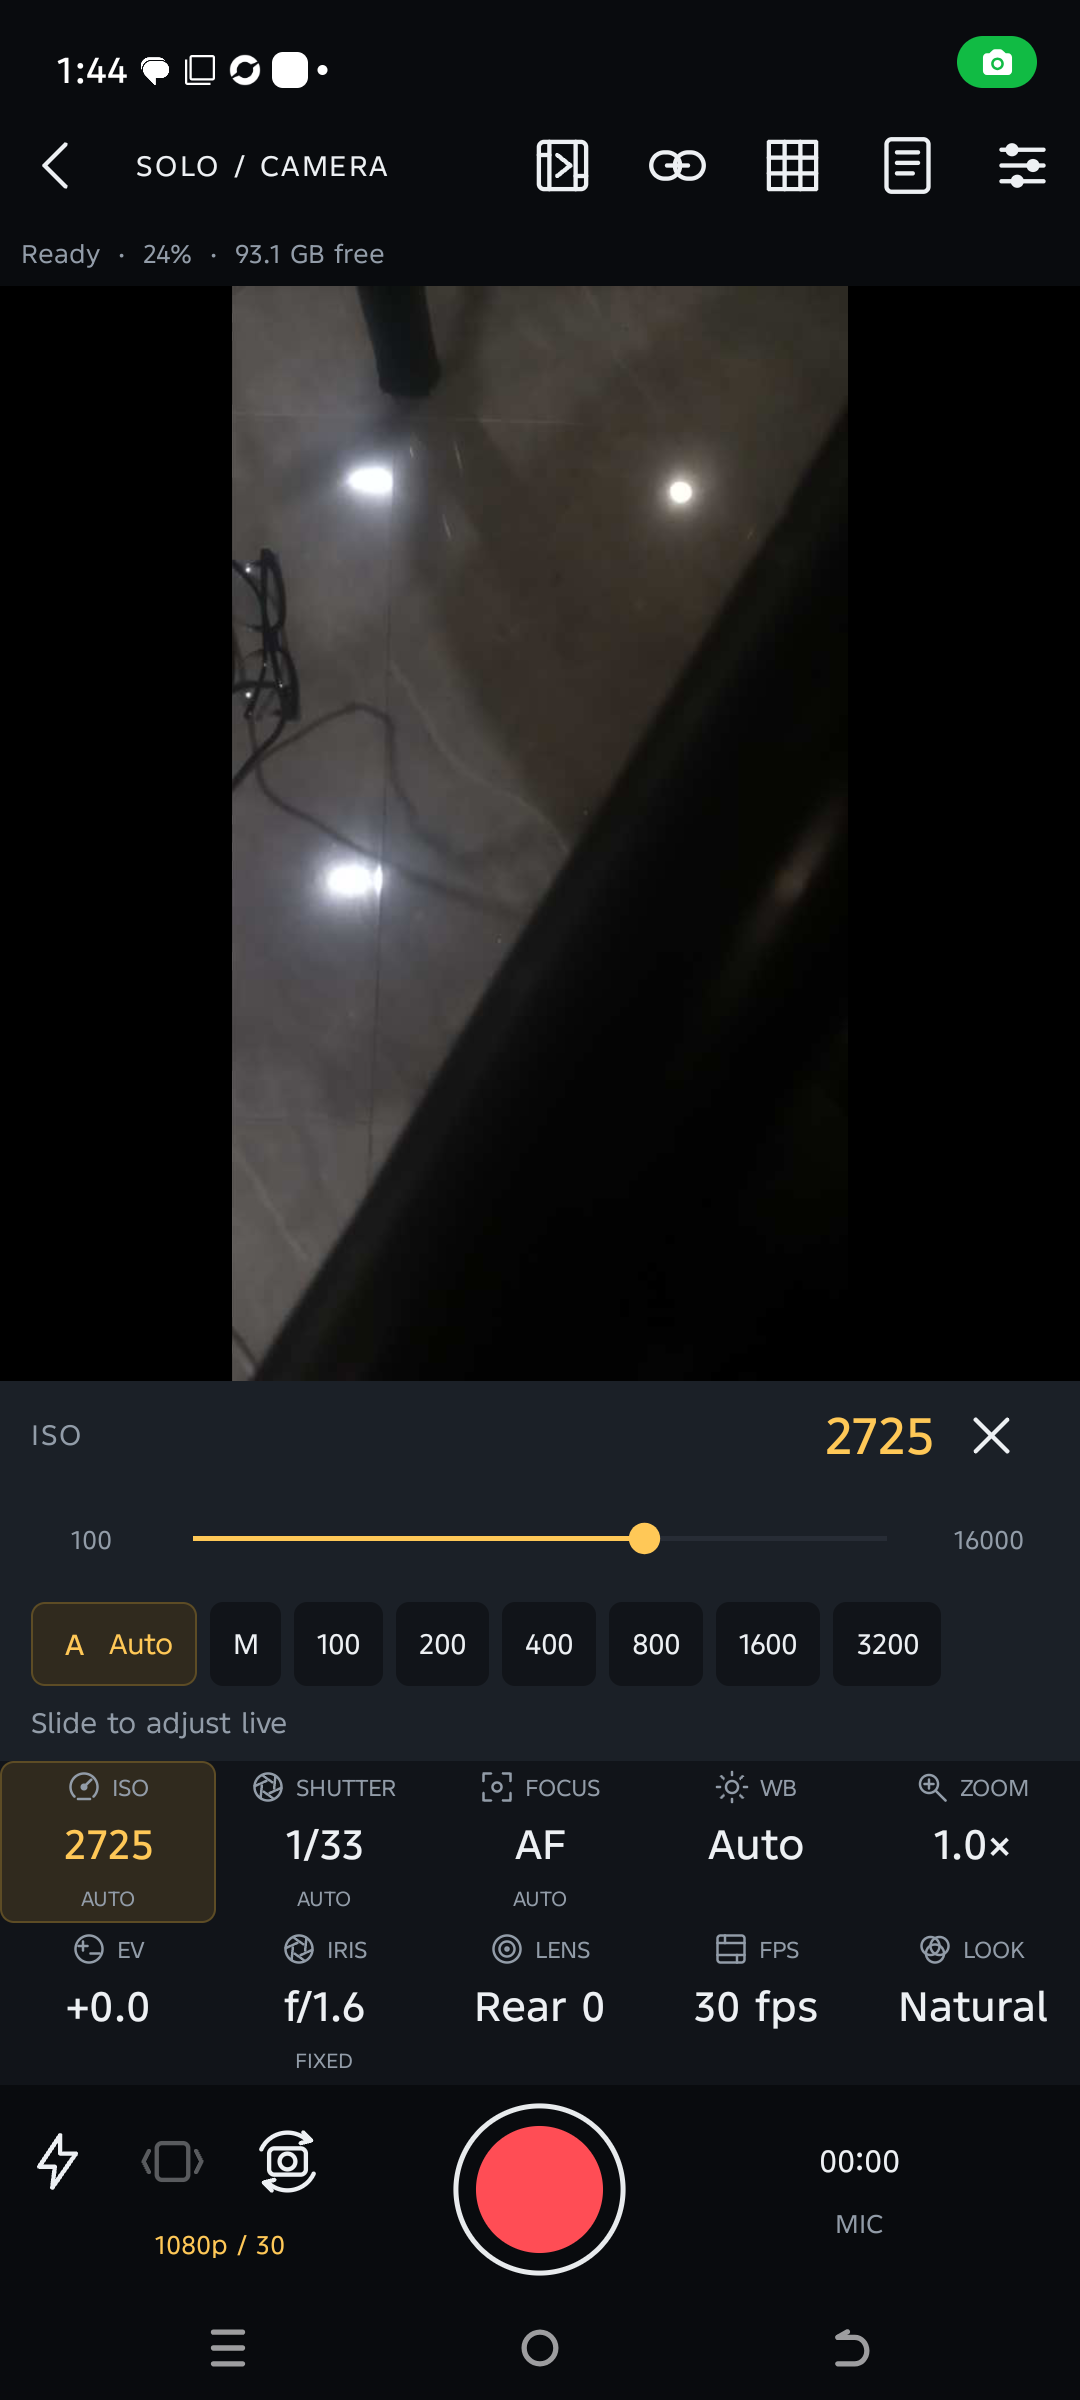
ISO adjustment
- ISO slider. Drag the slider and watch the preview.
- Auto. Tap Auto to let the phone adjust ISO again.
Shutter speed changes how motion looks
Shutter speed is how long the camera gathers light for each frame. A longer time captures more light and makes movement blur more. A shorter time makes fast movement look sharper and needs more light. For a talking video at 30 frames per second, try 1/60 second if your phone supports it. For fast movement outdoors, try a faster shutter and check a test clip.
Aperture is the opening in the lens
A smaller f-number means a wider opening. For example, f/1.6 lets in more light than f/2.8 on the same lens. A wider opening can also make the background look blurrier. In Solo Camera, look for Iris. If it says Fixed, that phone and lens don’t let the app change the opening. Add light or adjust ISO or shutter speed instead. Move your subject farther from the background if you want more blur.
Exposure compensation tells Auto to aim brighter or darker
When Auto makes a face too dark against a bright window, try a small plus EV adjustment or move the person away from the window. Try minus EV if bright parts lose detail. Turn on zebra stripes if available. They help you spot bright areas that may lose detail.
Focus, lenses, and zoom
Focus decides which part of the picture is sharp. Tap a face or product in the preview. Use Auto for someone who moves. For a person sitting in one place, focus on their eyes and lock focus if your phone supports it. Focus peaking marks sharp edges on the preview when available.
Lenses and zoom change how much you see. A wide lens helps in tight rooms. The front camera helps you see yourself. Try the rear camera when you have a second phone to monitor the shot. If digital zoom makes the picture look soft, move the phone closer or choose a suitable lens.
Framing and steadiness help viewers follow your shot. Use the grid to level the picture. Use a tripod for a still shot and test stabilization for handheld filming. Check a short clip before the real take.
 123
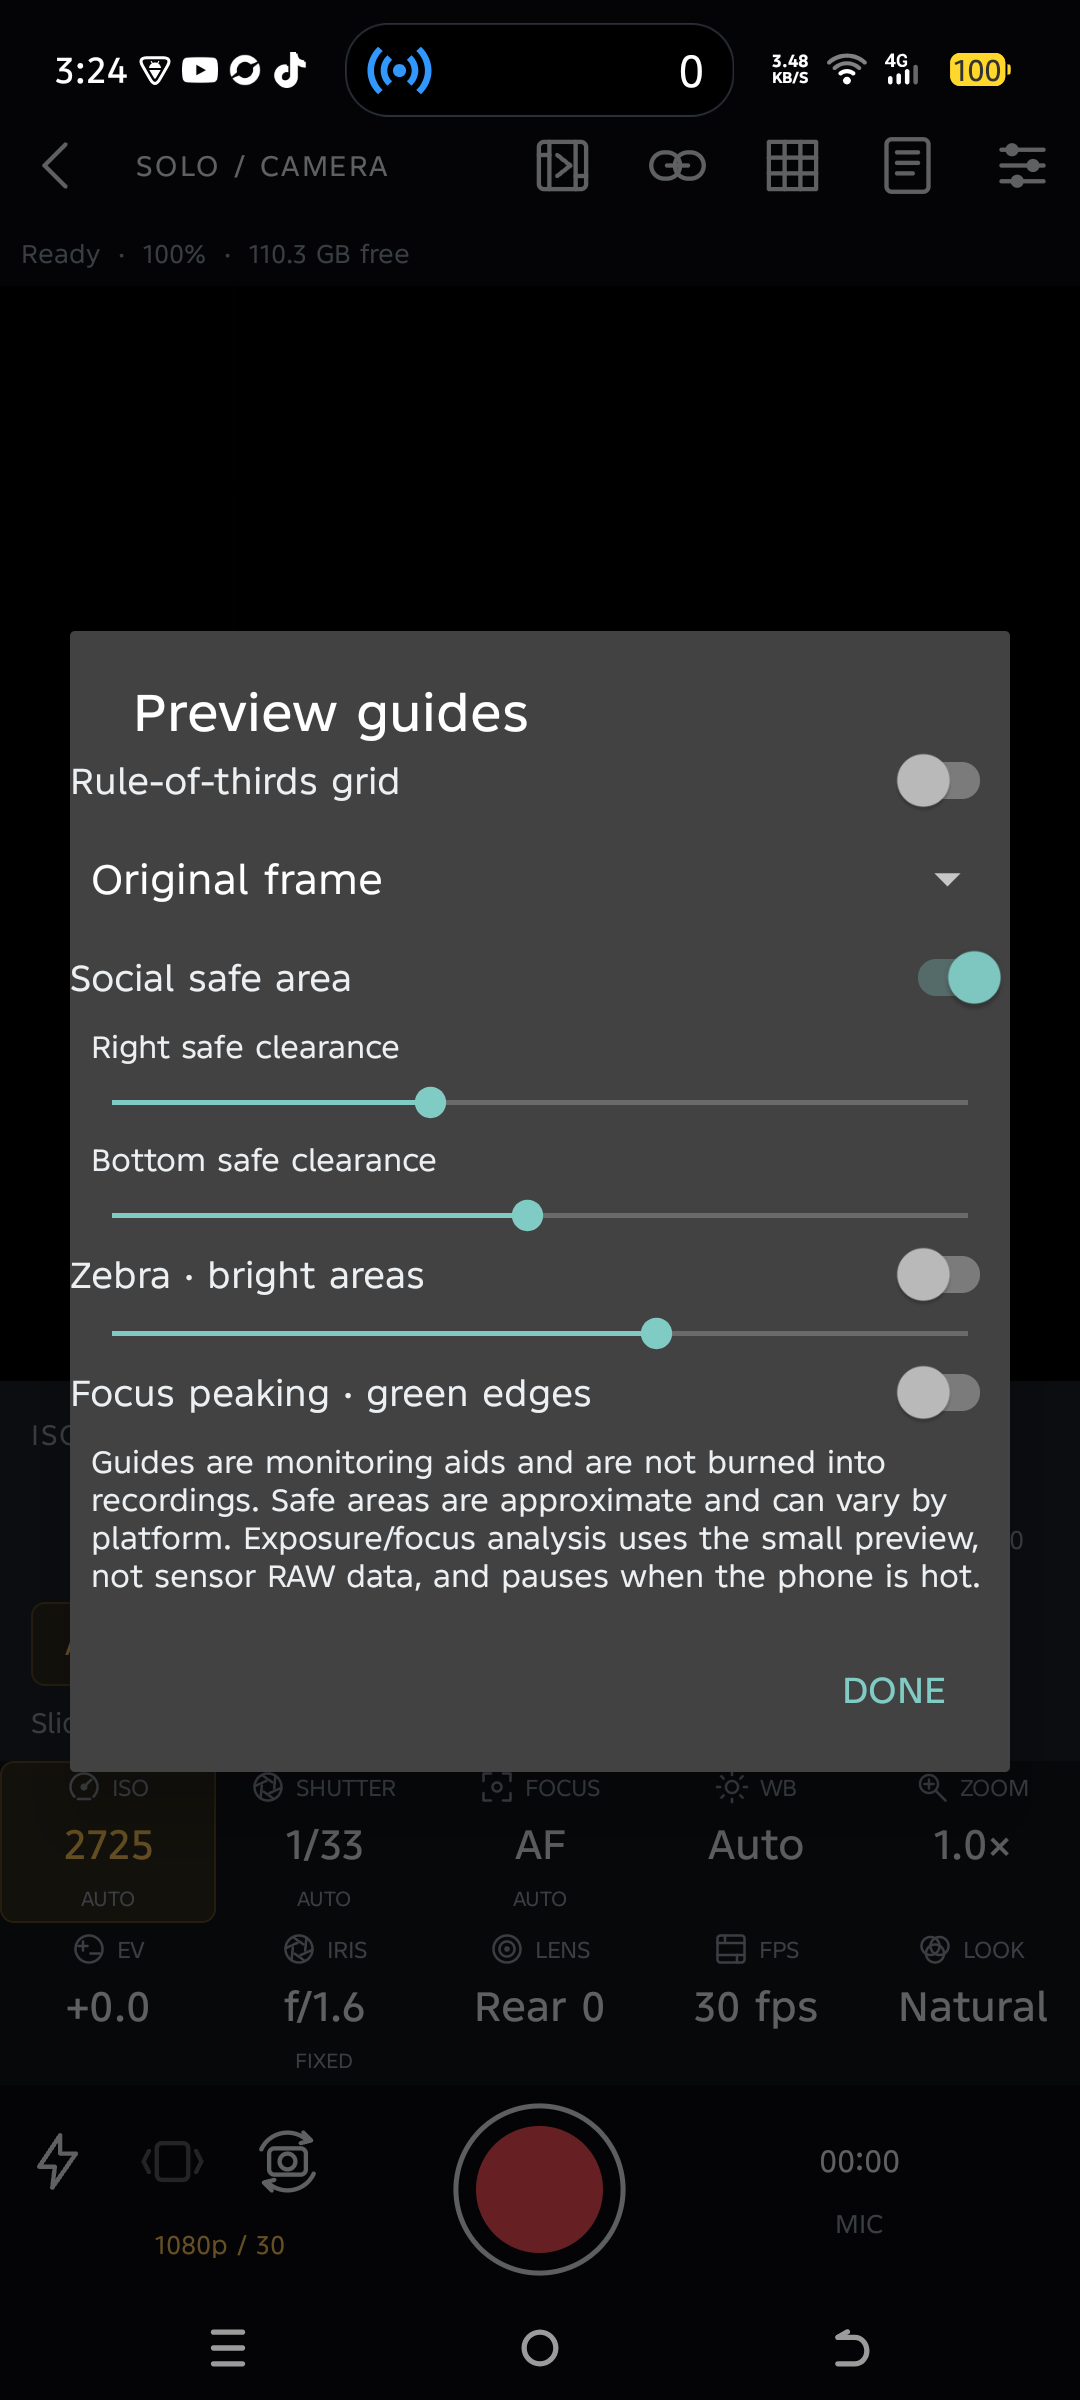
Preview guides
- Rule-of-thirds grid. Use the lines to place your subject and keep the shot level.
- Zebra. Find bright areas that may lose detail.
- Focus peaking. Look for colored edges to help you check focus.
Video quality, frame rate, and sound
Resolution controls how much picture detail you record. Start at 1080p for most videos. Try 4K if your phone supports it and you need extra detail or room to crop. 4K files take up more space.
Frame rate is the number of pictures recorded each second. Start with 30 fps for everyday video. Choose 60 fps for fast action if your phone offers it and you have enough light. Use 24 or 25 fps if that matches the rest of your project. If lights flicker, record a short clip under the actual lights and try another supported shutter speed or frame rate.
Looks change the style of the colors. Start with a neutral look and set your white balance before trying a style. Check skin tones and save a test clip.
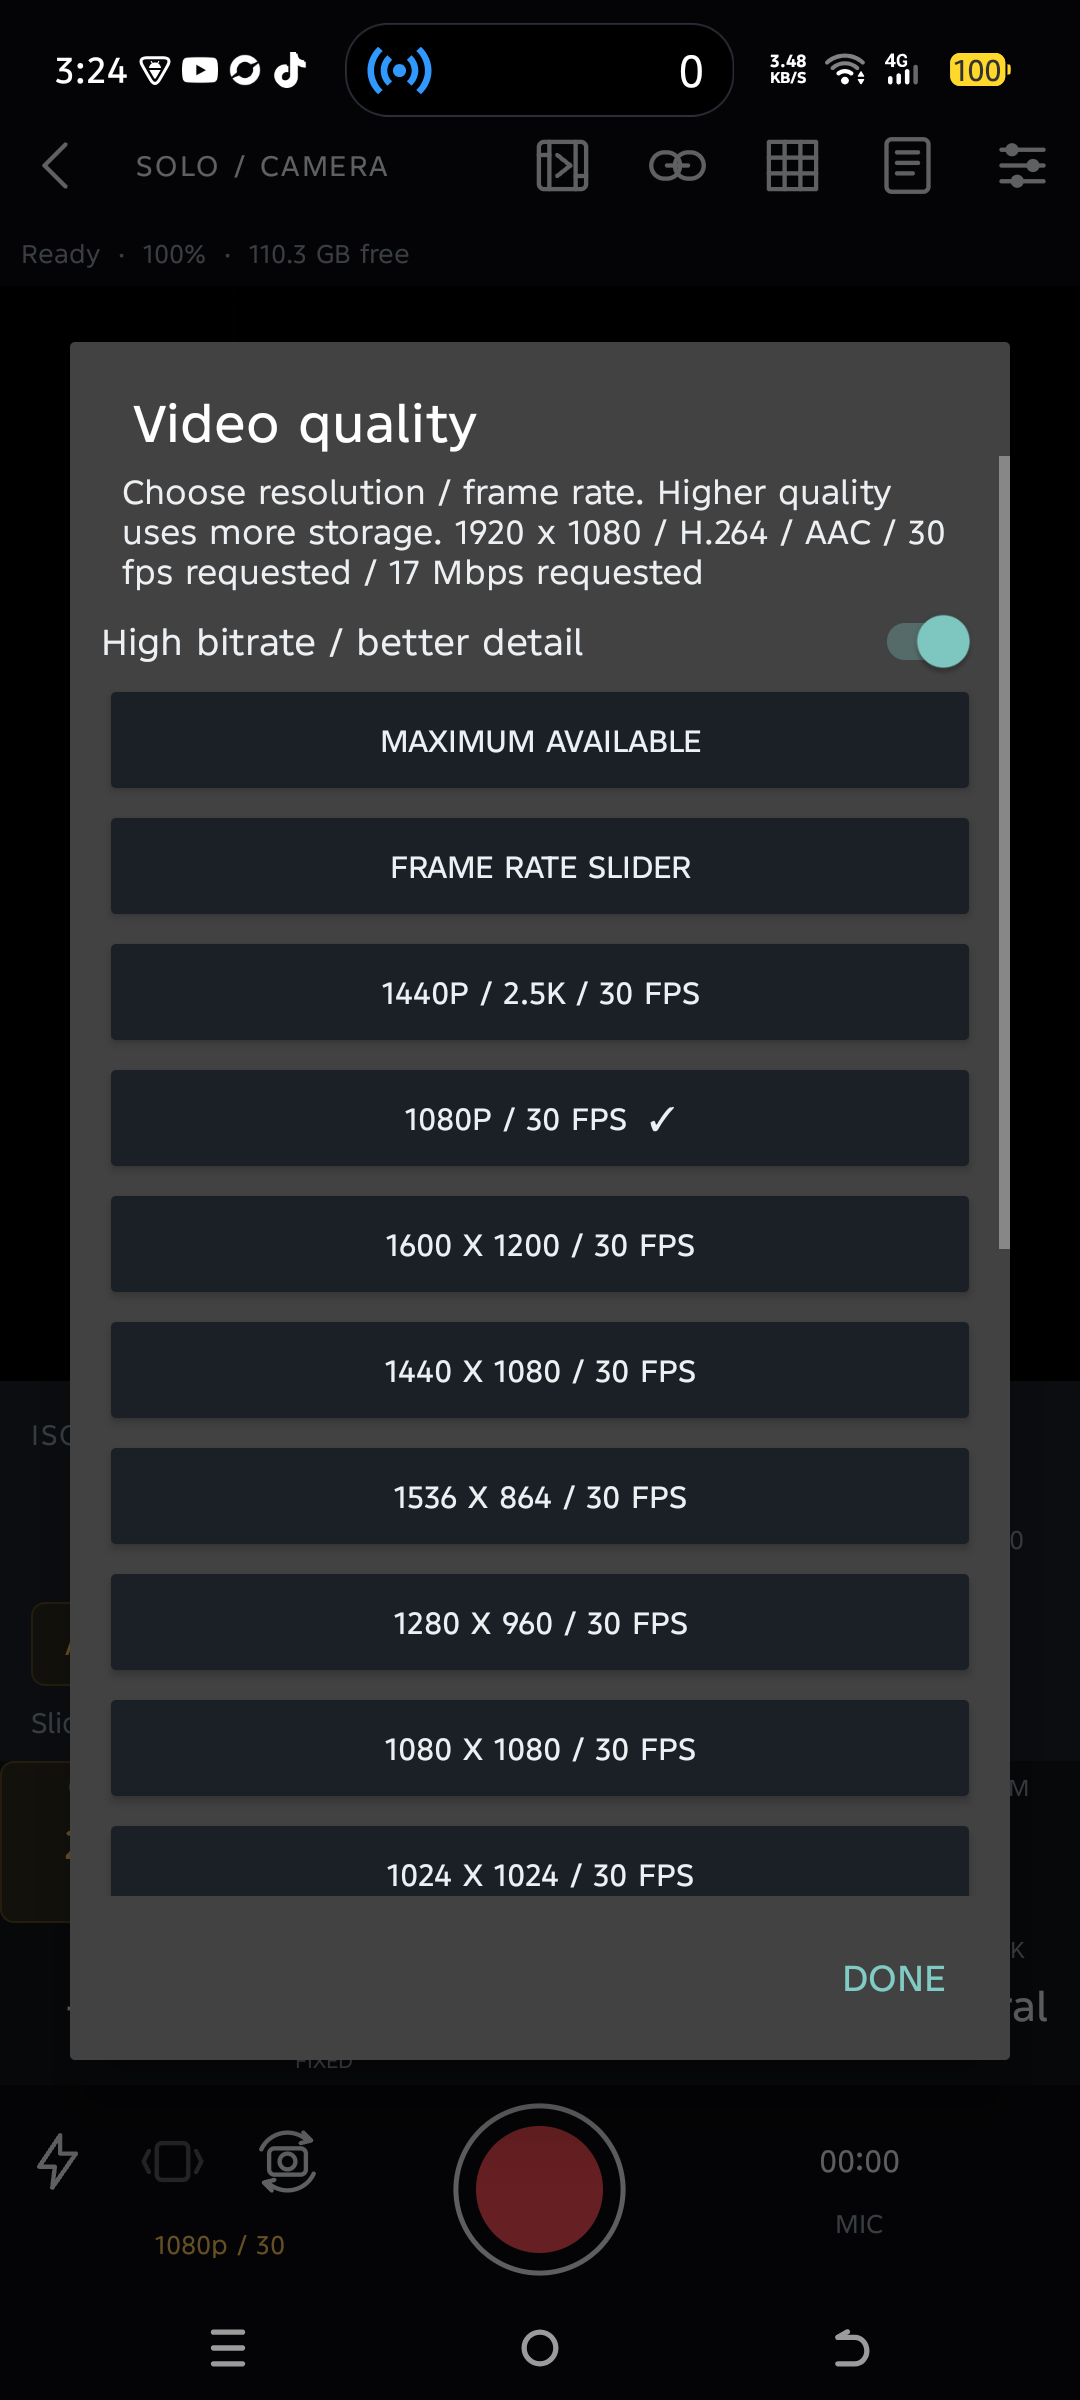 123
Video quality
- High bitrate. Use it for more detail if you have space.
- Frame rate slider. Choose one of the rates your phone supports.
- Resolution preset. Pick a size and frame rate together.
Sound matters as much as the picture. Pick your microphone in Shooting setup. Place it close to the speaker, record a short test, and play it back. Lower the level if voices sound harsh or the meter peaks.
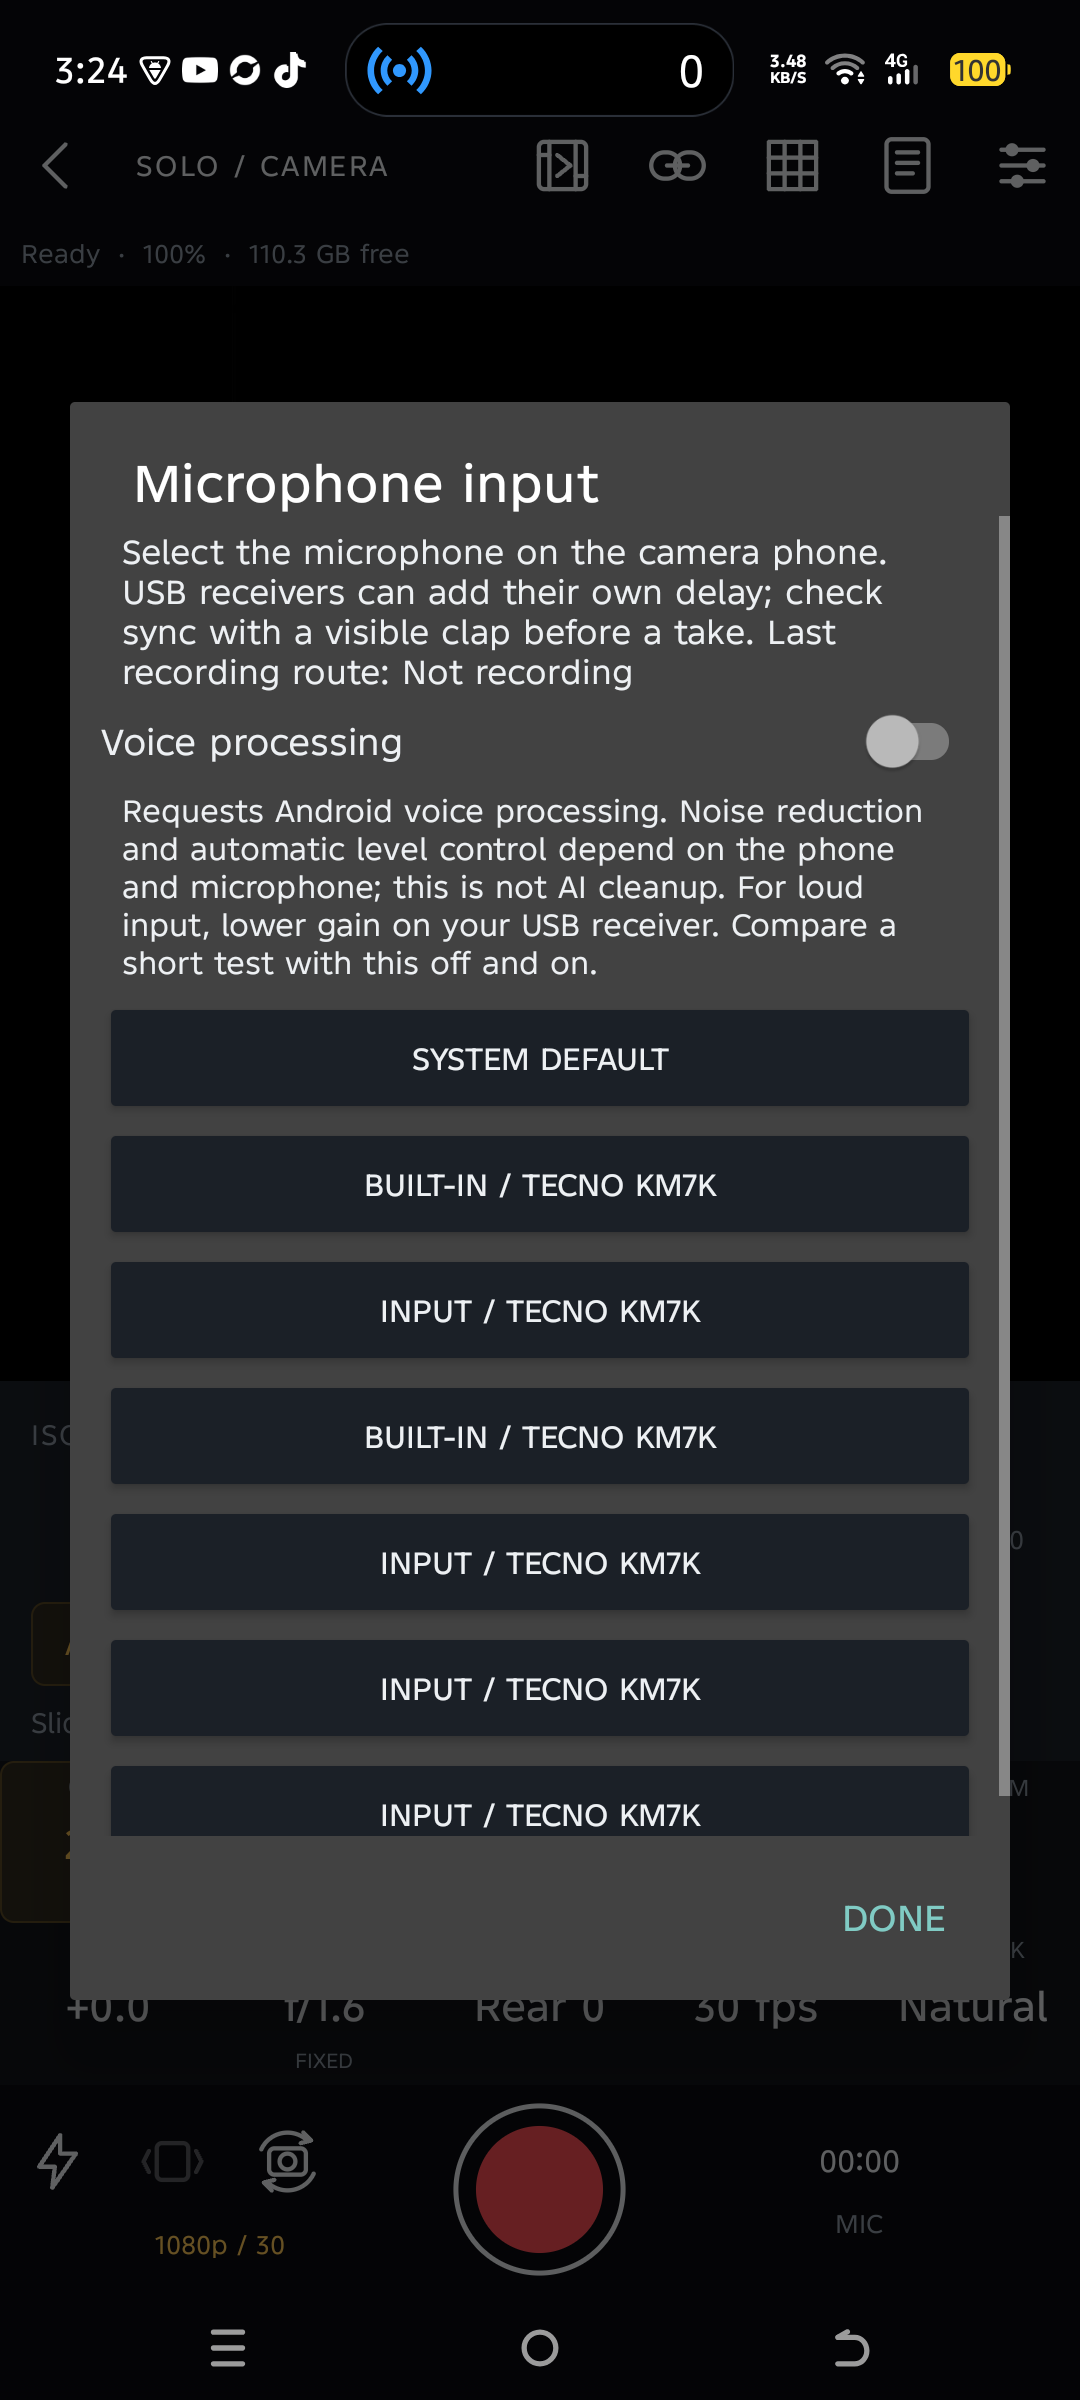 12
Microphone input
- Voice processing. Record a short test with it on and off to hear which sounds better.
- System default. Let Android select the microphone, or choose an input below.
Use a countdown to get into position. Use the teleprompter to read near the lens. Check framing on a second phone if the recording phone is out of reach.
What to use in common situations
- Talking at a desk. Try 1080p at 30 fps, put a light in front of you, and focus on your eyes.
- Sports outdoors. Try 60 fps if supported. Use a shorter shutter time if movement looks too blurry.
- A dim room. Move toward a lamp or add a light before raising ISO. Listen for room noise before recording.
- A product demo. Put the phone on a tripod. Set focus and white balance for the product, then record a test and check the colors.
Run a ten-second check before filming
- Pick the front or back camera and frame your shot. Use the grid or pair a second phone if you cannot see the screen from where you stand.
- Open Shooting setup and run the pre-recording check. Verify the microphone and listen to your voice at normal volume.
- Set a countdown or open the teleprompter if you need it. Record ten seconds and play it back in Studio.
- Fix the problem you can see or hear, then shoot again. If faces are dark, add light first. If the video is sharp but the sound is faint, move the microphone closer.
Preview quality changes what you see while filming. Use Video resolution / quality to change the saved video.